Tuesday, March 30, 2010
The while Loop
The C# while Loop :
Essentially, the while loop repeats a set of tasks until a specified condition is met. The while loop syntax is defined follows:
while (''condition'')
{
// C# statements go here
}
where condition is an expression that will return either true or false and the // C# statements go here comment represents the C# code to be executed while the condition expression is true. For example:
int myCount = 0;
while ( myCount <>
{
myCount++;
}
In the above example, the while expression will evaluate whether the myCount variable is less than 100. If it is already greater than 100 the code in the braces is skipped and the loop exits without performing any tasks.
If, on the other hand, myCount is not greater than 100 the code in the braces is executed and the loop returns to the while statement and repeats the evaluation of myCount. This process repeats until the value of myCount is greater than 100, at which point the loop exits.
The Switch ...case Construct
In this lesson we are going to learn about a conditional statement called the switch statement. Usually if and if else [color=#3333FF]statements are taught before switch statements. Although these are very useful, I find the switch to be easier and more fun to use.
The program written below is very similar to the previous program where the user is asked to enter their name, however now the program will look for four distinct string values and ti will generate output according to the string entered. Here are the things to observe when reading and replicating this program.
1.) 2 string variables are declared (greeting and fullName)
2.) A value is assigned using our Console.ReadLine() method. (Point where we insert the value.)
3.) the value of the variable greeting depends on the value entered for the variable fullName
4.) The program is case sensitive. Basically this is because different case letters have different values. So a lower case t will not evaluate the same as an upper case T. So ulitmately what does this mean. Well let's if you entered george bush as opposed to George Bush, you would get the default greeting because the program would not recognize your lower case entry of george bush as George Bush. If it does not make sense, run the program and change the case. You will see what I mean.
5.) Lastly, the default option is included in the case statement for the instances where neither of the output meets any of the criteria of the case statement.
CODE:
using System;
namespace ConsoleApplication
{
///
/// Testing out the case Statement
///
class switchStatement
{
///
/// The main entry point for the application.
///
[STAThread]
static void Main(string[] args)
{
string fullName, greeting;
Console.Write("Please enter your name: ");
fullName = Console.ReadLine();
switch (fullName)
{
case "YOUR NAME HERE":
greeting = "You are the best!!";
break;
case "Bill Gates":
greeting = "You are super wealthy!";
break;
case "George Bush":
greeting = "hmmm????";
break;
case "Kenneth Lay":
greeting = "How is Court Going?";
break;
default:
greeting = "I'm sorry I did not recognize you!";
break;
}//end switch statement
Console.WriteLine();
Console.WriteLine(greeting);
Console.WriteLine();
Console.WriteLine("Press [ENTER] to Exit");
Console.ReadLine();
}//end Main
}//end class "switchStatement
}//end namespace
As I might have mentioned on my previous post I am using Visual Studio. I believe the Express version is out on the web for free. However you might need to install NetFramework before you proceed to install VS.
Also, just like the previous program, an adobe file will be attached with the source code. variables and comments are all color coded.
The if ...else Construct
Copy
bool flagCheck = true;
if (flagCheck == true)
{
Console.WriteLine("The flag is set to true.");
}
else
{
Console.WriteLine("The flag is set to false.");
}
Remarks:
If the expression in the parenthesis is evaluated to be true, then the Console.WriteLine("The boolean flag is set to ture."); statement is executed. After executing the if statement, control is transferred to the next statement. The else is not executed in this example.
If you wish to execute more than one statement, multiple statements can be conditionally executed by including them into blocks using {} as in the example above.
The statement(s) to be executed upon testing the condition can be of any kind, including another if statement nested into the original if statement. In nested if statements, the else clause belongs to the last if that does not have a corresponding else.
For example:
        if (x > 10)
    if (y > 20)
        Console.Write("Statement_1");
    else
       Console.Write("Statement_2");
In this example, Statement_2 will be displayed if the condition (y > 20) evaluates to false. However, if you want to associate Statement_2 with the condition (x >10), use braces:
        if (x > 10)
{
    if (y > 20)
        Console.Write("Statement_1");
}
else
    Console.Write("Statement_2");


Example 1:
In this example, you enter a character from the keyboard and the program checks if the input character is an alphabetic character. If so, it checks if it is lowercase or uppercase. In each case, the proper message is displayed.
// statements_if_else.cs
// if-else example
using System;
class IfTest
{
   static void Main()
   {
       Console.Write("Enter a character: ");
       char c = (char)Console.Read();
       if (Char.IsLetter(c))
       {
           if (Char.IsLower(c))
           {
               Console.WriteLine("The character is lowercase.");
           }
           else
           {
               Console.WriteLine("The character is uppercase.");
           }
       }
       else
       {
           Console.WriteLine("Not an alphabetic character.");
       }
   }
}
Input:

2

Sample Output:
Enter a character: 2
The character is not an alphabetic character.
Additional sample might look as follows:
Run #2:
Run #3:
It is also possible to extend the if statement to handle multiple conditions using the following else-if arrangement:
This example checks if the input character is lowercase, uppercase, or a number. Otherwise, it is not an alphanumeric character. The program makes use of the else-if ladder.
// statements_if_else2.cs
// else-if
using System;
public class IfTest
{
static void Main()
{
Console.Write("Enter a character: ");
char c = (char)Console.Read();
if (Char.IsUpper(c))
{
Console.WriteLine("Character is uppercase.");
}
else if (Char.IsLower(c))
{
Console.WriteLine("Character is lowercase.");
}
else if (Char.IsDigit(c))
{
Console.WriteLine("Character is a number.");
}
else
{
Console.WriteLine("Character is not alphanumeric.");
}
}
}
Input
E
Sample Output
Copy
Enter a character: E
The character is uppercase.
Additional sample runs might look as follows:
Run #2
Copy
Enter a character: e
The character is lowercase.
Run #3:
Copy
Enter a character: 4
The character is a number.
Run #4:
Copy
Enter a character: $
The character is not alphanumeric.
Logical Operators in C#
| Operator | Description |
| == | equal to |
| > | greater then |
| >= | greater than or equal to |
| < | less than |
| <= | less than or equal to |
| ! | not |
| != | not equal to |
| && | logical AND |
| || | logical OR |
Logical Operators:
& Bitwise AND
The & operator compares two values with a bitwise AND function. You use the & operator with two operands, like this:
Evaluate a & b
Each of the operands a and b is converted to a binary number, and each of their bits is compared; that is, bit 1 of a is compared with bit 1 of b, and so on. When two corresponding bits are both 1, bitwise AND combines them to produce 1. When one or both of the corresponding bits are 0, bitwise AND combines them to produce 0.
For example, if you enter
Evaluate 25 & 77
25 and 77 are combined with a bitwise AND, and the result is 9.
~ Bitwise NOT
In a logical expression, the ~ operator computes the binary negative of a number. The binary negative is calculated by converting a character's 0 bits to 1 bits and its 1 bits to
0 bits.
For example, to find the binary negative of 5, you could enter
Evaluate ~5
The result of this command is -6.
| Bitwise OR
The | operator compares two values with a bitwise OR function. You use the | operator with two operands, like this:
Evaluate a | b
Each of the operands a and b is converted to a binary number, and each of their bits
is compared; that is, bit 1 of a is compared with bit 1 of b, and so on. When two corresponding bits are both 0, bitwise OR combines them to produce 0. When either of the corresponding bits is 1, bitwise OR combines them to produce 1.
For example, if you enter
Evaluate 25 | 77
25 and 77 are combined with a bitwise OR, and the result is 93.
^ Bitwise XOR
The ^ operator compares two values with a bitwise XOR (that is, a bitwise exclusive OR) function. You use the ^ operator with two operands, like this:
Evaluate a ^ b
Each of the operands a and b is converted to a binary number, and each of their bits is compared; that is, bit 1 of a is compared with bit 1 of b, and so on. When one of the bits--but not both--is 1, bitwise XOR combines them to produce 1. When both bits are 0 or when both bits are 1, bitwise XOR combines them to produce 0.
For example, if you enter
Evaluate 25 ^ 77
25 and 77 are combined with a bitwise XOR, and the result is 84.
+= Increment a variable
The += character is used only with the Evaluate command and adds the value on the right side of the expression to the variable on the left side. For example, in the command
Evaluate myVar += 2
the value of {myVar} is increased by 2. In the Evaluate command, you do not need to place the variable name inside braces because the command does not extract the value of the variable. For more information, see the { } Enclose a variable entry.
-= Decrement a variable
The -= character is used only with the Evaluate command and subtracts the value on the right side of the expression from the variable on the left side. For example, the command
Evaluate myVar -= 2
decreases the value of {myVar} by 2. In the Evaluate command, you do not need to place the variable name inside braces because the command does not extract the value of the variable. For more information, see the { } Enclose a variable entry.
== Equal to (strings, numbers, and variables)
The character == means "equals" when it compares text strings, arithmetic values, or variables that contain text strings or arithmetic values. If the value of the expressions are equal, the command returns 1, meaning true; if the expressions are not equal, the command returns 0, meaning false.
The command
Evaluate (3 * 4 * 27) == (6 * 9 * 3 * 2)
computes the values of each side and returns the value 1, for true. Note that arithmetic expressions use integer arithmetic. For example, the expression 5 2 yields 2, not 2.5.
The command
Evaluate {a} == 0
checks whether the current value of the variable {a} is 0 and returns 1 or 0.
When used with a text string, the match is case sensitive; for example,
Evaluate "theWorld" == "theworld"
returns 0.
=~ Equivalent to (patterns)
The =~ operator is used with the Evaluate command to evaluate whether a text string, or a variable that contains a text string, matches a regular expression. You must place the left operand within double quotation marks and the right operand within forward slashes. For example, the following command evaluates the strings yes and no, finds that they are not the same, and displays a 0, meaning false:
Evaluate "yes" =~ /no/
You can also use the =~ character with variables, as in
Evaluate "{a}" =~ /{b}/
which compares the current values of the variables {a} and {b}. If {a} and {b} have the same value, Evaluate returns 1, meaning true. If {a} and {b} do not have the same value, Evaluate returns 0, meaning false. The command
Evaluate "{a}" =~ /$[0-9a-f]+/
checks whether the variable {a} contains a hexadecimal number. If {a} does, Evaluate returns 1. If {a} does not contain a hexadecimal number, Evaluate returns 0.
> Greater than
In arithmetic expressions, the > character means "greater than." You can use the > character to compare the values of numbers or variables. For example, the command
Evaluate 5 > 10
evaluates whether 5 is greater than 10 and then displays 0, meaning false, in the active window. Likewise, the command
Evaluate {a} > {b}
evaluates the current values of {a} and {b} and then displays 0 (false) or 1 (true) in the active window. If you enter the commands
Set a 4
Set b 3
Evaluate {a} > {b}
Evaluate displays 1 in the active window.
>= Greater than or equal to
The >= character means "greater than or equal to" and has the same meaning as the ≥ character.
≥ Greater than or equal to [Option-.]
The ≥ character means "greater than or equal to" and has the same meaning as the >= character.
You can use the ≥ character to compare the values of numbers or variables. For example, the command
Evaluate 15 ≥ 10
evaluates whether 15 is greater than or equal to 10 and then displays 1 (true) in the active window. Likewise, the command
Evaluate {a} ≥ {b}
compares the current values of the variables {a} and {b}, and displays either 0 (false) or 1 (true) in the active window. If you enter the commands
Set a 100
Set b 88
Evaluate {a} ≥ {b}
Evaluate displays 1 in the active window.
<>
In arithmetic expressions, the < character means "less than." You can use the < character to compare the values of numbers or variables. For example, the command
Evaluate 5 < 10
evaluates whether 5 is less than 10, and then displays 1, meaning true, in the active window. Likewise, the command
Evaluate {a} < {b}
evaluates the current values of the variables {a} and {b} and displays either 0 (false) or 1 (true) in the active window. If you enter the commands
Set a 7
Set b 77
Evaluate {a} < {b}
Evaluate displays 1 in the active window.
<= Less than or equal to
The <= character means "less than or equal to" and has the same meaning as the ≤ character.
≤ Less than or equal to [Option-,]
The ≤ character means "less than or equal to" and has the same meaning as the <= character.
You can use the ≤ character to compare the values of numbers or variables. For example, the command
Evaluate 15 ≤ 10
evaluates whether 15 is less than or equal to 10 and then displays 0, which means false, in the active window. Likewise, the command
Evaluate {a} ≤ {b}
compares the current values of the variables {a} and {b} and displays either 0 or 1 in the active window. If you enter the commands
Set a 88
Set b 100
Evaluate {a} ≤ {b}
Evaluate displays 1 in the active window.
&& Logical AND
The && operator means logical AND and has the same meaning as the AND operator.
AND Logical AND
The AND operator means logical AND and has the same meaning as the && operator.
Logical AND is based on the principle that if both sides of an expression are true (that is, not equal to 0), then the expression is true. If either side or both sides of the expression are false (that is, equal to 0), the expression is false.
For example, the command
Evaluate 2 AND 3
returns 1, or true. But the command
Evaluate 2 AND 0
returns 0. You can use the AND operator to check whether the value of a variable is 0. For example, if you enter
Evaluate {Status} AND {Value}
Evaluate returns 0 if either variable is currently set to 0.
! Logical NOT
In arithmetic expressions, the ! operator means logical NOT and has the same meaning as the ¬ operator and the NOT operator.
¬ Logical NOT [Option-L]
In arithmetic expressions, the ¬ operator means logical NOT and has the same meaning as the ! operator and the NOT operator.
The ¬ operator is also used in selection expressions (see the ¬ Not in the following list entry).
NOT Logical NOT
In arithmetic expressions, the NOT operator means logical NOT and has the same meaning as the ¬ and ! operators. Logical NOT evaluates whether a number or variable has a value of 0. If the character or variable has a value of 0, the result of the command is 1, which means true. If the character or variable has a value other than 0, the result of the command is 0, which means false.
For example, the command
Evaluate NOT 100
displays 0 in the active window. But the command
Evaluate NOT 0
displays 1.
|| Logical OR
The || operator means logical OR and has the same meaning as the OR operator.
OR Logical OR
The OR operator means logical OR and has the same meaning as the || operator.
Logical OR is based on the principle that if either side of a statement is true (that is, not equal to 0), the statement is true. If both sides of a statement are false (that is, equal to 0), then the statement is false.
For example, the command
Evaluate 2 OR 0
returns 1, or true. However, the command
Evaluate 0 OR 0
returns 0, or false. You can use the OR operator to check whether the value of a variable is 0. For example, if you enter
Evaluate {checking} OR {savings}
Evaluate returns 0 only if the current values of both {checking} and {savings} are 0. If either {checking} or {savings} has a positive or negative value, Evaluate returns 1.
!= Not equal to (strings, numbers, and variables)
The != operator means "not equal to" and is used between two numbers or variables in an expression. The != operator has the same meaning as the <> and ≠ operators.
<> Not equal to
The <> operator means "not equal to" and is used between two numbers or variables in an expression. The <> operator has the same meaning as the ≠ and the != operators.
≠ Not equal to [Option-=]
The ≠ operator means "not equal to" and is used between two numbers or variables in an expression. The operator has the same meaning as the != and the <> operators.
If the two sides of the expression are not equal, the command returns 1, meaning true. If the two sides are equal, the command returns 0, meaning false.
For example, the command
Evaluate 2 ≠ 5
is 1, or true. If you enter a command like
Evaluate {a} ≠ {b}
the command checks the current values of the variables {a} and {b}, determines whether they are not equal, and returns 1 for true, or 0 for false.
!~ Not equivalent to (patterns)
The !~ character is used with the Evaluate command to evaluate whether a text string or a variable that contains a text string matches a regular expression. When you use the !~ character between two operands, you must place the left operand within double quotation marks and the right operand within forward slashes. For example, the following command evaluates the strings yes and no, finds that they are not the same, and displays a 1, meaning true:
Evaluate "yes" !~ /no/
You can also use the !~ character with variables, as in
Evaluate "{a}" !~ /{b}/
This example compares the current values of the variables {a} and {b}. If {a} and {b} have the same value, Evaluate returns 0, meaning false. If {a} and {b} do not have the same value, Evaluate returns 1, meaning true. The command
Evaluate "{a}" !~ /$[0-9a-f]+/
returns 1 (for true) if the variable {a} does not contain a hexadecimal number.
<< Shift left
The << operator performs a shift left function on a number. A shift left function shifts a value's bits n characters to the left. The bits that are shifted out through the high-order bit are lost. For example, if you enter
Evaluate 3 << 1
the bit pattern in the number 3 is shifted left by one place. In other words, the bit pattern
... 0000 0011 #the value 3
becomes
... 0000 0110 #the value 6
Shifting left one place actually has the effect of multiplying a value by 2.
>> Shift right
The >> operator performs a shift right function on a number. A shift right function shifts a value's bits n characters to the right. The bits moved out of the low-order bit are lost, and the bits shifted in to the high-order bits on the left have a value of 0. For example, if you enter
Evaluate 3 >> 1
the bit pattern
... 0000 0011
becomes
... 0000 0001
which has a value of 1. The right shift is a logical right shift, because bits with a value of 0 are moved into the high-order bits.
Comparison Operators
| Example | Name | Result |
|---|---|---|
| $a == $b | Equal | TRUE if $a is equal to $b. |
| $a === $b | Identical | TRUE if $a is equal to $b, and they are of the same type. (PHP 4 only) |
| $a != $b | Not equal | TRUE if $a is not equal to $b. |
| $a <> $b | Not equal | TRUE if $a is not equal to $b. |
| $a !== $b | Not identical | TRUE if $a is not equal to $b, or they are not of the same type. (PHP 4 only) |
| $a < $b | Less than | TRUE if $a is strictly less than $b. |
| $a > $b | Greater than | TRUE if $a is strictly greater than $b. |
| $a <= $b | Less than or equal to | TRUE if $a is less than or equal to $b. |
| $a >= $b | Greater than or equal to | TRUE if $a is greater than or equal to $b. |
Another conditional operator is the "?:" (or ternary) operator, which operates as in C and many other languages.
(expr1) ? (expr2) : (expr3);Comparison with Various Types:
This expression evaluates to expr2 if expr1 evaluates to TRUE, and expr3 if expr1 evaluates to FALSE.
| Type of Operand 1 | Type of Operand 2 | Result |
|---|---|---|
| null or string | string | Convert NULL to "", numerical or lexical comparison |
| bool or null | anything | Convert to bool , FALSE < TRUE |
| object | object | Built-in classes can define its own comparison, different classes are uncomparable, same class - compare properties the same way as arrays (PHP 4), PHP 5 has its own explanation |
| string , resource or number | string , resource or number | Translate strings and resources to numbers, usual math |
| array | array | Array with fewer members is smaller, if key from operand 1 is not found in operand 2 then arrays are uncomparable, otherwise - compare value by value (see following example) |
| array | anything | array is always greater |
| object | anything | object is always greater |
Example #1 Transcription of standard array comparison
// Arrays are compared like this with standard comparison operators
function standard_array_compare($op1, $op2)
{
   if (count($op1) <> count($op2)) {
       return 1; // $op1 > $op2
   }
   foreach ($op1 as $key => $val) {
       if (!array_key_exists($key, $op2)) {
           return null; // uncomparable
       } elseif ($val < $op2[$key]) {             return -1;         } elseif ($val > $op2[$key]) {
           return 1;
       }
   }
   return 0; // $op1 == $op2
}
?>
Ternary Operator:
Another conditional operator is the "?:" (or ternary) operator.
Example #2 Assigning a default value
Since PHP 5.3, it is possible to leave out the middle part of the ternary operator. Expression expr1 ?: expr3 returns expr1 if expr1 evaluates to TRUE, and expr3 otherwise.
Note: Please note that the ternary operator is a statement, and that it doesn't evaluate to a variable, but to the result of a statement. This is important to know if you want to return a variable by reference. The statement return $var == 42 ? $a : $b; in a return-by-reference function will therefore not work and a warning is issued in later PHP versions.
Example #3 Non-obvious Ternary Behaviour
// on first glance, the following appears to output 'true'
echo (true?'true':false?'t':'f');

// however, the actual output of the above is 't'
// this is because ternary expressions are evaluated from left to right

// the following is a more obvious version of the same code as above
echo ((true ? 'true' : false) ? 't' : 'f');

// here, you can see that the first expression is evaluated to 'true', which
// in turn evaluates to (bool)true, thus returning the true branch of the
// second ternary expression.
?>
Comparison operators test whether two expressions are the same. Comparison operators can be used on all expressions except expressions of the text, ntext, or image data types. The following table lists the Transact-SQL comparison operators.
| Operator | Meaning |
|---|---|
| Equal to | |
| Greater than | |
| Less than | |
| Greater than or equal to | |
| Less than or equal to | |
| Not equal to | |
| Not equal to (not ISO standard) | |
| Not less than (not ISO standard) | |
| Not greater than (not ISO standard) |
Unary Operators
+ Unary plus operator; indicates positive value (numbers are positive without this, however)
- Unary minus operator; negates an expression
++ Increment operator; increments a value by 1
-- Decrement operator; decrements a value by 1
! Logical complement operator; inverts the value of a boolean
The following program, UnaryDemo, tests the unary operators:
class UnaryDemo {
public static void main(String[] args){
int result = +1; // result is now 1
System.out.println(result);
result--; // result is now 0
System.out.println(result);
result++; // result is now 1
System.out.println(result);
result = -result; // result is now -1
System.out.println(result);
boolean success = false;
System.out.println(success); // false
System.out.println(!success); // true
}
}
The increment/decrement operators can be applied before (prefix) or after (postfix) the operand. The code result++; and ++result; will both end in result being incremented by one. The only difference is that the prefix version (++result) evaluates to the incremented value, whereas the postfix version (result++) evaluates to the original value. If you are just performing a simple increment/decrement, it doesn't really matter which version you choose. But if you use this operator in part of a larger expression, the one that you choose may make a significant difference.
The following program, PrePostDemo, illustrates the prefix/postfix unary increment operator:
class PrePostDemo {
public static void main(String[] args){
int i = 3;
i++;
System.out.println(i); // 4"
++i;
System.out.println(i); // "5"
System.out.println(++i); // "6"
System.out.println(i++); // "6"
System.out.println(i); // "7"
}
}
The unary operators requires only one operand to perform different kind of operations such as increasing/decreasing a value, negating an expression, or inverting a boolean value. These operators can not be used with final variables. There are different types of unary operators mentioned in the table given below:
| Symbol | Name of the Operator | Operation | Example |
| + | Unary plus operator | indicates positive value (however, numbers are positive without this) | int number = +1; |
| - | Unary minus operator | negates an expression | number = - number; |
| ++ | Increment operator | increments a value by 1 | number = ++ number; |
| -- | Decrement operator | decrements a value by 1 | number = -- number; |
| ! | Logical compliment operator | inverts a boolean value |
I. Unary Plus (+) Operator:
Unary plus operator (+) indicates positive value. This (+) operator is used to perform a type conversion operation on an operand. The type of the operand must be an arithmetic data type i.e. if a value of the integer operand is negative then that value can be produced as a positively applying unary plus (+) operator. For example, lets see the expressions shown as:
int x = 0;
int y = (-25);
x = (+y);
In this expression, a negative value is assigned to the variable "y". After applying unary plus (+) operator on the operand "y", the value becomes 25 which indicates it as a positive value.
However a number is positive without using unary plus (+) operator, if we have initially assigned it positively into the operand in the program.
II. Unary minus (-) Operator:
Unary minus operator (-) indicates negative value and differ from the unary plus operator. This (-) operator is also used to perform a type conversion operation on an operand. If a value of the integer operand is positive then that value can be produced as a negatively applying unary minus (-) operator. For example, lets see the expressions shown as:
int x = 0;
int y = 25;
x = (-y);
In this expression, a positive value is assigned tothe variable "y". After applying minus plus (-) operator on the operand "y", the value becomes "-25" which indicates it as a negative value. This behavior represents the number in two's complement format.
III. Increment (++) and Decrement Operators
The increment/decrement operators can be a prefix or a postfix .In a prefix expression (++ x or -- x), an operator is applied before an operand while in a postfix expression (x ++ or x --) an operator is applied after an operand. In both conditions 1 is added to the value of the variable and the result is stored back to the variable. However both operators have the same effect as "x = x + 1;"
Although there is a major difference between a prefix and a postfix expressions. In a prefix expression, a value is incremented first then this new value is restored back to the variable. On the other hand, In postfix expression the current value is assigned to a variable then it is incremented by 1 and restored back to the original variable.
( i ) example using prefix unary operator:
public class Prefix{
public static void main(String[] args){
int x = 0;
int y = 0;
y = ++x;
System.out.println("The value of x :" + x);
System.out.println("The value of y:" + y);
}
}
Output of the Program:
C:\nisha>javac Prefix.java
C:\nisha>java Prefix
The value of x :1
The value of y:1
The output of this program shows that always 1 is stored in both variables i.e. the value of "x" is incremented first then it is assigned to the variable "y".
( ii ) example using postfix unary operator:
 public class Postfix{
     public static void main(String[] args){
      int x = 0;
          int y = 0;
          y = x++;
      System.out.println("The value of x :"+     x );
      System.out.println("The value of y:" + y     );
   }
 }
The logical compliment (!) operator is also known as Boolean Negation Operator. It is used to invert the value of a boolean type operand i.e. the type of the operand must be boolean while using this operator,. If the value of the boolean operand is false, the ! operator returns true. But, if the value of the operand is true, the ! operator returns false.
Arithmetic assignment Operators
One of the most common operators that you'll encounter is the simple assignment operator "=". You saw this operator in the Bicycle class; it assigns the value on its right to the operand on its left:
int cadence = 0;
int speed = 0;
int gear = 1;
This operator can also be used on objects to assign object references, as discussed in Creating Objects.
The Arithmetic Operators:
The Java programming language provides operators that perform addition, subtraction, multiplication, and division. There's a good chance you'll recognize them by their counterparts in basic mathematics. The only symbol that might look new to you is "%", which divides one operand by another and returns the remainder as its result.
+ additive operator (also used for String concatenation)
- subtraction operator
* multiplication operator
/ division operator
% remainder operator
The following program, ArithmeticDemo, tests the arithmetic operators.
class ArithmeticDemo {
public static void main (String[] args){
int result = 1 + 2; // result is now 3
System.out.println(result);
result = result - 1; // result is now 2
System.out.println(result);
result = result * 2; // result is now 4
System.out.println(result);
result = result / 2; // result is now 2
System.out.println(result);
result = result + 8; // result is now 10
result = result % 7; // result is now 3
System.out.println(result);
}
}
You can also combine the arithmetic operators with the simple assignment operator to create compound assignments. For example, x+=1; and x=x+1; both increment the value of x by 1.
The + operator can also be used for concatenating (joining) two strings together, as shown in the following ConcatDemo program:
class ConcatDemo {By the end of this program, the variable thirdString contains "This is a concatenated string.", which gets printed to standard output.
public static void main(String[] args){
String firstString = "This is";
String secondString = " a concatenated string.";
String thirdString = firstString+secondString;
System.out.println(thirdString);
}
}
Using Operates:
Outputting Numeric Values:
Before we begin the examination of the arithmetic operators we will take a brief aside. So far in the C# Fundamentals tutorial there has been no discussion of outputting numeric values to the screen. As we are about to start modifying the values in variables, it is important to be able to view the results of the operations.
In the first part of the C# Fundamentals tutorial, a console application was created and the console was outputted to using the Console.WriteLine command. The Console.WriteLine command may also be used to output numeric data types.
For example:
int quantity = 5;
Console.WriteLine(quantity);    // Outputs 5
You can use the Console.WriteLine command to test the examples provided in the following sections
Basic Arithmetic Operators:
There are five basic arithmetic operators available to the C# developer. These are used for addition (+), subtraction (-), multiplication (*), division (/) and modulus (%). Of these, the first four are available to almost every programming language.
Here are some simple examples:
int a = 6;It is important to remember that the resultant value of a mathematical operation is subject to the rules of the receiving variable's data type. The result of a division operation may yield a floating point value. However, if this is assigned to an integer then the fractional part will be truncated. Equally important, and less obvious, is the effect of an operation performed on several integers and assigned to a non-integer. In this case, the result is calculated as an integer before being implicitly converted. This means that although the resultant value is assigned to a floating point variable, the fractional part is still truncated unless at least one of the values is explicitly converted first.
int b = 3;
int result;
result = a + b; // result = 9
result = a - b; // result = 3
result = a * b; // result = 18
result = a / b; // result = 2
result = a + b - 1; // result = 8
The following examples illustrate this:
int a = 7;
int b = 3;
int integerResult;
float floatResult;

integerResult = a / b;          // integerResult = 2  (truncated)
floatResult = a / b;            // floatResult = 2.0  (truncated)
floatResult = (float)a / b;     // floatResult = 2.33333325
The last of the basic arithmetic operators is modulus. The modulus operator yields a value equal to the remainder of an integer division. As an example, when ten is divided by three the answer is three with a remainder of one. One is the modulus value. The modulus value can be used with both integer and floating point data types
int a = 10;Increment and Decrement Operators:
int b = 3;
float c = 3.5F;
int integerResult;
float floatResult;
integerResult = a % b; // integerResult = 1
floatResult = a % b; // floatResult = 1.0
floatResult = a % c; // floatResult = 3.0
C# provides two operators that can be used to increase or decrease a variable's value by one. These are the increment operator (++) and the decrement operator (--). The increment and decrement operators are known as unary operators because they are applied to a single value. The operators can be placed before the variable to be adjusted (prefix) or after it (postfix) for similar results.
// All of these commands add one to the variable "a"The above examples give the impression that the prefix and postfix varieties of the increment and decrement operators yield the same results. This is true in the simple scenarios examined so far. However, when the operators are used as a part of a more complex expression there is an important difference. Where the prefix variation is used, the increment or decrement operation is applied before the value of the variable is applied to the rest of the calculation. Where the postfix version is used, the original value of the variable is used.
a = a + 1;
++a; // prefix
a++; // postfix
// All of these commands subtract one from the variable "a"
a = a - 1;
--a;
a--;
int a;Operator Precedence:
int b;
// Prefix. a is incremented before its value is assigned to b
a = 10;
b = ++a; //a = 11, b = 11;
// Postfix. a is incremented after its value is assigned to b
a = 10;
All of the operators discussed in this article may be used together in a single expression. The result of the expression is dependant upon the order in which the individual operators are applied. This order is determined by the operator precedence, which applies an importance to each operator.
Over the next few articles we will build a table of the operator precedence for the most important C# operators. For the operators described so far, the order of precedence is as follows:
Increment / Decrement Operators:
++(postfix) --(postfix) ++(prefix) --(prefix)
Basic Arithmetic Operators:
* / % + -
It is important to understand the effect of the operator precedence table. The following code gives examples of how the importance of an operator affects the end result of an expression:
int a = 10;Parentheses Operator:
int b = 6;
int c = 2;
int result;
// * is applied before +
result = a + b * c; //result = 22
// / is applied before -
result = a - b / c; //result = 7
// Order of precedence is *, /, +, -
result = a * b + b / c - 1; //result = 62
The parentheses operator allows modification of the order of precedence for operators. By surrounding parts of an expression with parentheses, the precedence of this part of the expression is increased to be of higher importance than items outside of the parentheses. The parentheses may also be nested. The order in which the operators are applied in the previous examples can therefore be modified.
int a = 10;
int b = 6;
int c = 2;
int result;

result = (a + b) * c;             //result = 32

result = (a - b) / c;             //result = 2

result = a * (b + b / (c - 1));   //result = 120
Friday, March 26, 2010
Chapter 3 :- Operators and Programming Constructs
By branching we imply, having different paths for execution. Conditions are used to determine which statements need to be executed. Suppose, you have a program to store the details of employees. Depending upon the post of the employee, there would be various fields associated with it. A department head, for example, would have a property denoting the department he heads, etc. We use conditional branching in such a scenario.
C# provides the following conditional constructs:-
if .. else
Syntax:-
if ( <> )
{
statements
}
else
{
statements
}
The else part is optional and can be omitted. The working of if .. else construct is very simple and follows the pattern - If this is true I’ll do that or else I’ll do something else. The statements included within the if block are executed when the condition specified in if, is true, otherwise the statements inside the else block are executed. In case, there is no else statement, the execution flow continues to the proceeding statements.
Here’s an example:-
Console.WriteLine("Enter your age:");
int Age = Convert.ToInt32(Console.ReadLine());
if (Age
{
Console.WriteLine("You are not permitted in here.");
}
else
{
Console.WriteLine("You may come in.");
}
Lets step through the code. Line 1 displays a message Enter your age. At line 2, the age entered by the user is read using ReadLine() (as a string) and converted to an integer using the ToInt32 function. Finally the value is stored in the integer variable Age. When the execution reaches line 3, the expression inside if is evaluated. If the user supplied an age less than 18, the execution flow would move to line 5 - Console.WriteLine("You are not permitted in here."); and the message You are not permitted in here would be displayed. In the other scenario, when the age would be either equal to or greater than 18, line 7 would be executed and the message You may come in will be displayed.
The condition inside the if statement can be composed of a complex expression chained by the logical operators. For Example:-
Console.WriteLine("Enter your age:");
int Age = Convert.ToInt32(Console.ReadLine());
Console.WriteLine("Are you with your guardian? (True/False)");
bool WithGuardian = Convert.ToBoolean(Console.ReadLine());
if ((Age < withguardian =" false))
{
Console.WriteLine("You are not permitted in here.");
}
else
{
Console.WriteLine("You may come in.");
}
At line 4 the user's response of whether he/she is with a guardian would be stored inside the boolean variable WithGuardian. Notice that ToBoolean function is used to convert the input to boolean (True/False) value. At line 5, the complex expression will be evaluated. The expression is made up of two sub-expressions: Age <> and WithGuardian = false. These two expressions are joined with the logical AND operator (&&). Therefore, when both of the expressions amount to true, the entire expression would evaluate to true and the message - You are not permitted in here will be displayed. For any other combination, the final expression would be equivalent to false and the message - You may come in will be displayed.
A number of conditions can be chained by using else if as follows:-
Console.WriteLine("Enter your salary");
int Salary = Convert.ToInt32(Console.ReadLine());
if (Salary > 250000)
{
Console.WriteLine("Welcome Mr. CEO");
}
else if (Salary > 200000)
{
Console.WriteLine("Welcome Mr. Chairman");
}
else if (Salary > 0)
{
Console.WriteLine("Welcome Programmer");
}
else
{
Console.WriteLine("Welcome dear Customer");
}
In this case, if the salary supplied by the user is greater than 250000, the message - Welcome Mr. CEO will be displayed otherwise if the Salary is greater than 2000000 then the output will be Welcome Mr. Chairman else if the salary is greater than 0, the message - Welcome Programmer will be displayed. For any other value (Salary less than 1), the statements inside the else block would be executed and Welcome dear Customer will be the output.
switch .. case Construct
Switch case facilitates easy branching when the condition is pertaining to a single expression. Each supplied Value is preceded by a case construct.
Syntax:-
switch (<>)
{
case Expression_1;
statements
break;
case Expression_2;
statements
break;
….
}
break is a C# keyword, which is used to exit the body of a switch, for or while loop. Equivalent to the else construct is the default case. Statements within the default case are executed when no other condition holds true.
Example:-
Console.WriteLine("Enter the month (mm)");
int Month = Convert.ToInt32(Console.ReadLine());
switch (Month)
{
case 1:
Console.WriteLine("January");
break;
case 2:
Console.WriteLine("February");
break;
case 3:
Console.WriteLine("March");
break;
case 4:
Console.WriteLine("April");
break;
case 5:
Console.WriteLine("May");
break;
case 6:
Console.WriteLine("June");
break;
case 7:
Console.WriteLine("July");
break;
case 8:
Console.WriteLine("August");
break;
case 9:
Console.WriteLine("September");
break;
case 10:
Console.WriteLine("October");
break;
case 11:
Console.WriteLine("November");
break;
case 12:
Console.WriteLine("December");
break;
default:
Console.WriteLine("There are only 12 Months.");
break;
}
Depending on the value entered by the user (1-12), the appropriate month will be displayed. For any other value, the default case will be executed and the message There are only 12 Months. will be displayed.
Multiple Values can be made to lead to the same block of statements by excluding the break statement.
Console.WriteLine("Enter a number (1-10)");
int Num = Convert.ToInt32(Console.ReadLine());
switch (Num)
{
case 2:
case 3:
case 5:
case 7:
Console.WriteLine("The number is prime.");
break;
case 1:
case 9:
Console.WriteLine("The number is odd.");
break;
case 4:
case 6:
case 8:
Console.WriteLine("The number is Even");
break;
default:
Console.WriteLine("The number is not in range.");
break;
}
Looping:
A Set of instructions that are repeated is called a loop. Suppose you want to print numbers from 1 - 10. You could do that using Console.WriteLine statement for each of the 10 numbers. But, what if you had to print numbers from 1 - 1000? Using the computer’s iterative power is a much better approach.
C# supports 3 kinds of loops which are discussed below:-
The for loop
This loop is generally used for arithmetic operations, where we are aware of the starting and end point of the loop. Syntax of for loop is as follows:-
for(<>;<>;<>)
{
statements
}
To print numbers within a range, say 1 - 1000, we declare a counter variable (preferably single character variable like I), initialize it to the starting number (1) and keep incrementing its value by 1 until the number exceeds the end point (1000). Off course, we would have the body of the loop where the operation would be done, in this case, displaying the numbers on screen.
for(int I = 1; I <= 1000; I++)
{
Console.WriteLine(I);
}
Lets break the for statement down:-
Initialization: int I = 1
Condition: I <= 1000 Increment: I++ All the parts here are optional and can be left out. So, you can initialize the variable I, above the for statement and leave out the initialization block. The code would look like this (; I <= 1000; I++). Similarly, you could remove the condition part to make the loop infinite or you can include the increment statement within the body of the for statement itself (inside the { and } brackets).
Another variation of a for statement is the empty loop which does not contain any body: for(int I = 1; I <= 1000; I++);
Such a for statement is followed by the semicolon.
The while loop
The for loop cannot be used when the range of the loop is unknown (Well, actually it can, but the approach would not be logical). Say, you want to continue inputting values from the user as long he wishes to. This can be easily implemented by the while statement.
Syntax:-
while(<>)
{
statements
}
We don’t have initialization and increment/decrement slot over here. These need to be implemented additionally. Take a look at the code snippet below.
bool Continue = true;
while(Continue == true)
{
int A;
Console.WriteLine("Please Enter a Number");
A = Convert.ToInt32(Console.ReadLine());
Console.WriteLine("Continue (True/False)");
Continue = Convert.ToBoolean(Console.ReadLine());
}
We have declared a boolean variable Continue which we use to check whether to continue repeating the process. It has been initialized to true, so that the loop is executed for the first time. The user’s choice of whether to continue with the loop or not, is stored in Continue. As long as the user enters true, the statements within the body of the while loop would keep on executing.
Anything that can be implemented using for loop, can also be done using the while loop. Below is the code to print numbers from 1 - 1000 using while.
int I = 1;
while(I <= 1000)
{
Console.WriteLine(I);
I++;
}
The do while loop:
The do while loop is a variation of the while loop in which the condition is evaluated at the end of the loop. Thus, the loop is executed at least once. Recall the first while program we did. The bool variable continue stores the user’s choice. However, for the first iteration, it does not store the choice. In such a scenario, we had to initialize continue with the value true so that the loop is executed for the first time. A better approach would be to use the do while loop and check the condition at the end. The code for which is given below.
bool Continue;
do
{
int A;
Console.WriteLine("Please Enter a Number");
A = Convert.ToInt32(Console.ReadLine());
Console.WriteLine("Continue (True/False)");
Continue = Convert.ToBoolean(Console.ReadLine());
}
Compiling and Execute your first C# Program
When I first heard about Microsoft's newest language, C#, my mouth started watering. For the audience with which I mostly deal (beginner programmers trying to break into the business) I thought C# would be the great equalizer---after all, everyone (experienced programmers as well as beginners) would be learning it at the same time.
Many of you may know I'm in the process of writing a C# book--this article will detail how to install it, and how to write your first program. For more, you'll need to read my book!
Installing C#:
To install C#, for the moment anyway, you don't need to purchase a thing. You just need to get your hands on the Microsoft .Net Framework.
C# is a language that comes with the Microsoft .Net (pronounced DOT-NET) Framework. The .Net Framework is an environment that permits .Net programs to run. C# is just one of many programming languages supported by the .Net framework (it even includes COBOL). Something tells me it will eventually become the most important.
The .Net Framework is not an Operating System---it's more like a shell that runs within Windows. For now, the .Net Framework is available only as a Beta version (currently Beta2). That means it hasn't been released for sale. Beta versions can be flaky, and if you read the fine print at the Microsoft Website, they'll tell you NOT to install the .Net Framework on a production PC. If this warning scares you, wait until the .Net Framework production version is ready (most likely, you'll have to pay for it, although at this point no one is sure how much).
The .Net Framework can be installed on a PC running Windows XP, Windows 2000 and Windows NT (sorry, Windows 98 and Windows ME users can't install the .Net Framework, and therefore can't install C#). In addition, you'll need to have Internet Explorer 5.01 or later installed, plus MDAC 2.6 (Microsoft Data Access Components)Get the .Net Framework Software Developers Kit (SDK):
Right now, you can pick up the .Net Framework SDK from a variety of sources. I've received three in the mail for begin a registered of Visuowner al Basic 6, and I believe I've also seen CD's included in the Visual Basic Programmers Journal. At any rate, you can access this site
to download it. I should warn you the SDK is 123 Megabytes. You can download it all at once, in pieces, or get it from me if you take part in the C# class I'm offering in early 2002.
Install the .Net Framework SDK:
Once you have downloaded the SDK (install it in a folder of its own), double click on its Setup.exe program, and you should see a prompt similar to this one (if you don't have Internet Explorer 5.01 or higher installed, or MDAC 2.6, you will see different prompts).
If you have the CD, you'll see this screenshot when you insert the CD-ROM. Otherwise, you'll see the screenshot that asks you if you wish to install the .Net Framework SDK (two down…)
|
|
You don't want to install all of Visual Studio.Net--just the .Net Framework SDK, which is the part that contains the C# compiler (among other things). If you have the CD, click on 'Install only .NET Framework SDK'…
|
|
This is the window you'll see next. If you downloaded the SDK from the Microsoft Website, double clicking on the Setup.exe program will result in this window being displayed also. Answer 'Yes' to begin with the installation.
|
|
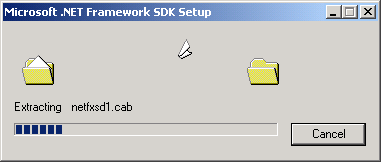
You should see files being copied and installed.
|
|
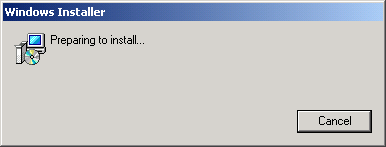
Fairly quickly, you should see this message. Answer 'yes'.
|
|
After answering 'Yes', you should see this window.
|
|
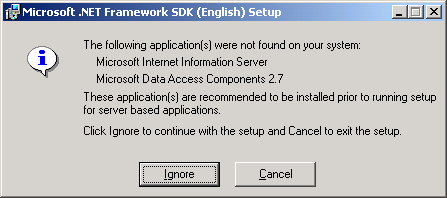
On my PC, I had MDAC 2.6 already installed, but the setup program suggested MDAC 2.7, and also Microsoft Internet Information Server. For the purpose of learning C#, you can click on Ignore.
|
|
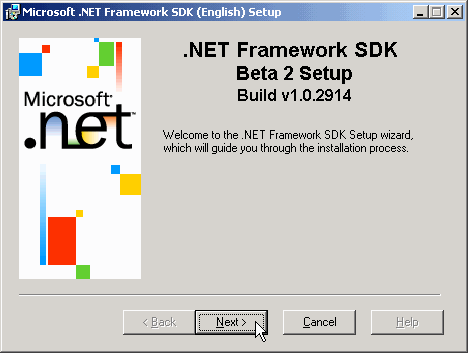
This is the window you should see next. Click on Next to continue the installation.
|
|
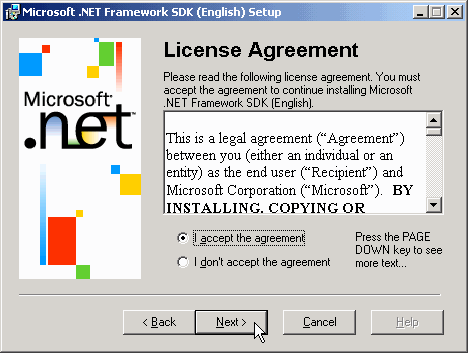
Be sure to read the license agreement--click on the button indicating you accept the agreement, then click on the Next button to continue the installation.
|
|
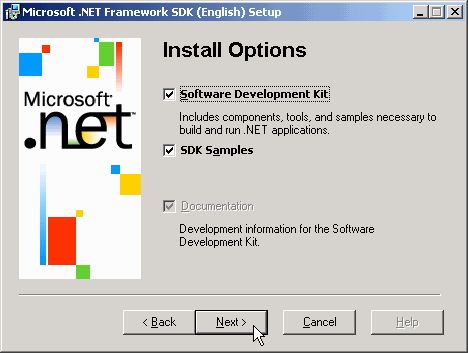
This is the default installation selection. You need the Software Development Kit, and I highly recommend that you install the SDK Samples as well. Click on the Next button to continue the installation.
|
|
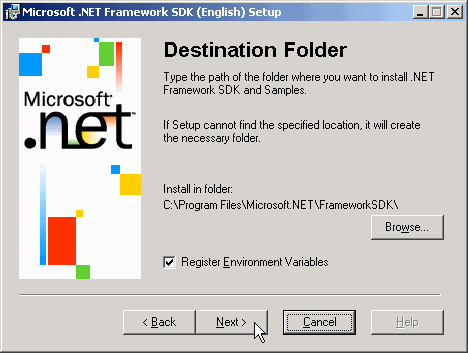
I suggest that you accept the Destination Folder--although if you are short on space on 'C', you may want to install to another drive if you have space there. Make certain that the 'Register Environment Variables' checkbox is selected--otherwise, when you try to compile your first C# program, Windows won't be able to find the compiler!
|
|
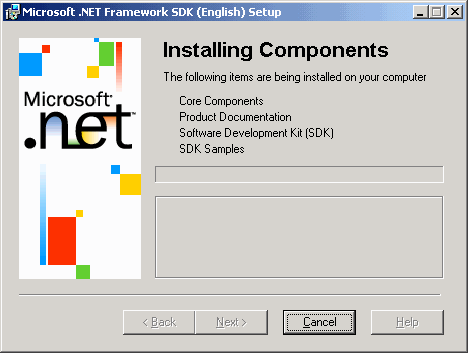
You should now see this window indicating that Components are being installed. On my PC, the Component installation took about ten minutes.
|
|
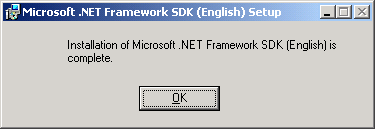
That's it--you'll receive this message indicating that the Installation is complete…
|
|
As is typical, you'll need to restart to finalize the installation. Click the 'Yes' button to restart.
|
|
Write your first C# program
After having successfully installed the .NET Framework SDK, among other things, the C# compiler will be installed somewhere in a folder on your PC. Provided you told the Installation program to update your Environmental variables, the location of the compiler should be registered properly on your PC, and you won't have to jump through any hoops to get the compiler to work.
Writing your first C# program is easy--start up Notepad and enter the following code…
class ILoveCSharp {
public static void Main(string[] args) {
System.Console.WriteLine("I love C#!");
}
}
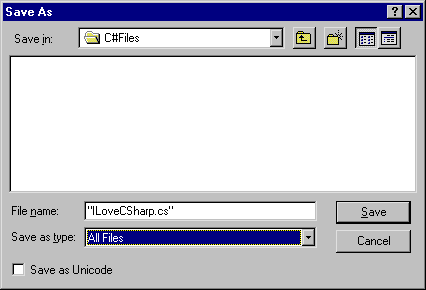
Now save the program as "ILoveCSharp.cs" ( I recommend saving all of your C# programs in a folder called C#Files)
|
|
Compile your first C# program
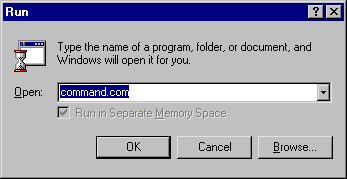
Compiling your program is easy---but we will need to run the compiler from a Command Prompt. To do so, click on the Start-Run button and enter
command.com
in the Open Textbox…
|
|
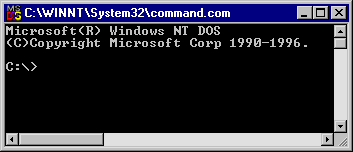
After you click on the OK button, you will see this window…
|
|
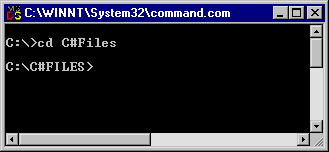
which is the Command Prompt window. Type
cd \C#Files
to make your C#Files folder your current directory…
|
|
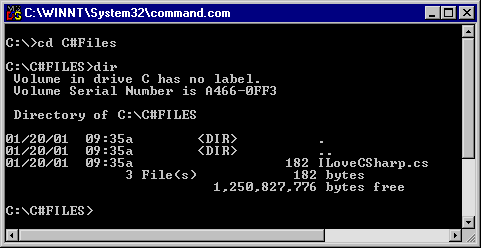
If you enter
dir
in the Command Prompt Window, you should see the C# program you just saved using Notepad.
|
|
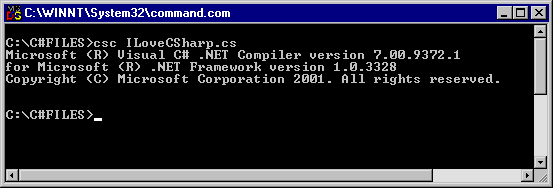
Now it's time to compile your program using the C# compiler, csc. Enter
csc ILoveCSharp.cs
at the command prompt…
|
|
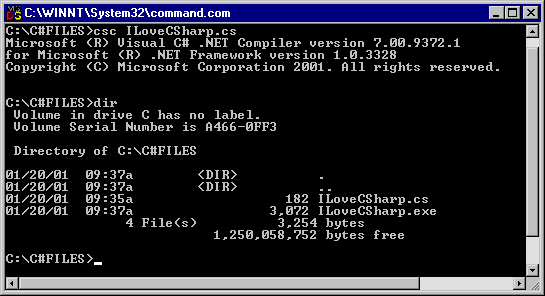
You should see a message that the compiler is executing. The absence of any error messages is great news--use the 'Dir' command to verify that your C# source file has been compiled into an executable…
|
|
Execute your first C# program
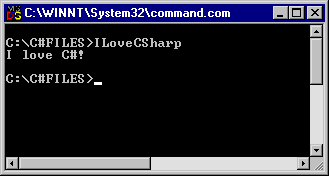
Executing your program is easy--just enter the name of your executable at the Command Prompt…
ILoveCSharp
|
|
You should see the phrase 'I love C#!' appear in the window.


